Creating a cat-safe space outdoors for your cat may seem like a complicated undertaking, but it doesn’t have to be difficult! Follow our guide below to help you determine which Purrfect Fence System(s) are best for your yard and how much fencing you need to get the job done.
We offer cat-safe fencing solutions for nearly any yard of any size - from a postage-stamp lawn to a multi-acre property. But the particular system you need to secure your outdoor space for your cat(s) will depend on some of the elements of your yard. There are two main types of fencing systems you can choose from:
The Freestanding Fence System
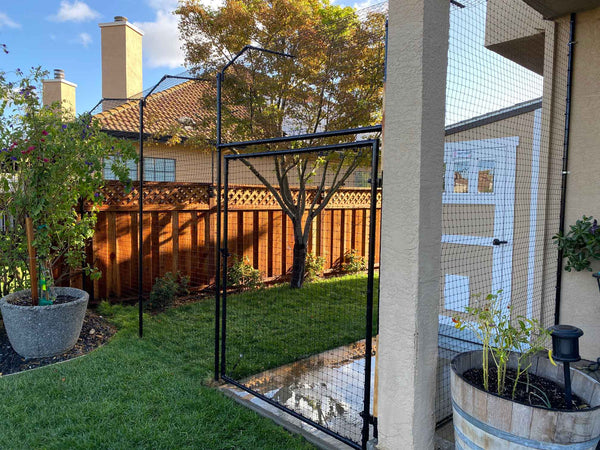
This system allows you to create a brand new fence line from the ground up. The full-height fence was designed specifically with cats (and their preferred methods of escape!) in mind, so every element was chosen specifically with cat safety and containment in mind. The height of this system is adjustable and can be set as high as 7 feet, although a minimum of 6 feet is recommended - measured from the ground or leaping surface up to the tip of the spring-loaded arm.

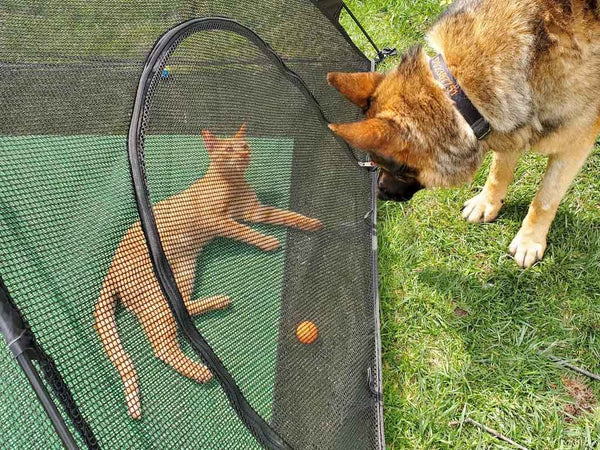
At this height, it places the arched top of the fence out of jumping distance for the average domestic cat. If the cat cannot simply leap up to or on top of the arched fence topper, they are forced to climb in order to attempt escape, which makes the fence most effective. As a cat climbs up and out toward the tip of the spring-loaded arm it must turn its back toward the ground. As the cat continues on, their weight will cause the end of the arm to drop suddenly, which imitates the feeling of falling and triggers the cat’s righting reflex that allows them to land on their feet. In order to turn over and land safely, the cat must let go of the fence.
Freestanding Fence is great in yards that do not have a traditional fence, or if the traditional fence is in disrepair. It is also an excellent choice for yards with obstacles to be worked around (more information on obstacles to follow), or for securing just a portion of the yard.
The Existing Fence Conversion System
If you have an existing fence surrounding your yard, then you can simply cat-proof the fence by adding a Purrfect Fence Existing Fence Conversion System to the top of the fence. This fence topper system can be installed on a fence of nearly any type from wood to chain link, vinyl and more.
There are two versions of this fence available and which you will need depends on the height of your existing fence. The height of your fence should be measured from the ground or leaping surface up to the height where the Purrfect Fence can be mounted (for most fences, you will be mounting the Purrfect Fence system to your fence posts). In some cases, the overall fence height and the mounting height may not be the same, so it is important to use the mounting height when finding fence height.
If the mounting height of your fence is less than 5 feet high, then it is recommended that you use our Conversion System for Shorter Fences. This particular system includes an extension tube and extra hardware that can add up to 3 feet of height to your fence and create a finished height of at least 6 feet.

If your mounting height is at least 5 feet high, then the standard Existing Fence Conversion System can be used (although you are welcome to use the Shorter Fence version for extra height!). This system can add up to 1 foot of additional height to your fence to create a finished height of at least 6 feet.

In some situations, you may find that you need a combination of systems to properly secure your yard. This may be due to varying heights of your existing fence(s), gaps within your existing fence, obstacles that need to be excluded from within the enclosure area, or if you are simply securing just a portion of the already-fenced area of your yard.

If your fence height drops below 5 feet at any point, then you may require a combination of both Conversion Systems to outfit your fence in order to maintain a consistent finished height of at least 6 feet. The Purrfect Fence systems can seamlessly transition from one to the next as needed.
If your existing fence has gaps in the fence line, or if you would simply prefer to create a smaller cat-safe enclosure within the already fenced portion of your yard, then you can use a combination of Conversion and Freestanding Fence systems.
The last thing to consider when determining fence type (and layout) is obstacles. Obstacles can look different from yard to yard, but common obstacles include trees near the fence line, AC units close to the fence, outdoor furniture, outbuildings like sheds, etc. These types of obstacles provide elevated surfaces for cats to jump from and more easily escape. While some obstacles, like furniture, can be easily relocated - other obstacles like AC units and trees are not as easy to move!
When using a Freestanding Fence System, it can usually be easier to work around obstacles as you do not have an existing fence line to follow. Placement of the Freestanding Fence can be more flexible to better work around obstacles or exclude them entirely from within the enclosure. To exclude a potential escape aid from within a Freestanding Fence enclosure, simply adjust your fence line. If you prefer to keep the obstacle inside of the fenced area, then we recommend placing the Freestanding Fence a distance away from it, so that the obstacle cannot be used for escape. As a general rule of thumb, posts should be at least 9 feet away from the obstacle on all sides.
Alternatively, some escape aids might be cat-proofed so that your cat(s) are unable to access the obstacles altogether. This involves building some type of cat-proof structure that prevents your cat from accessing the particular obstacle.
Trees are one of the most common obstacles that must be addressed. If a tree is near the fence line, it may be possible for a cat to climb up the tree, then jump down onto the Purrfect Fence to escape the cat-proof enclosure. Some trees can be cat-proofed by wrapping the trunks in a material that cats cannot get their claws into, such as aluminum sheeting or a flexible Plexiglass material. We offer a Tree Guard Kit that can be used on most trees for this purpose.

However, some trees like those with low forks and several branches, are not suitable for cat-proofing. In these instances, we often recommend using the Freestanding Fence to come in around the tree so that it is excluded from the cat-safe area.
More information about cat-proofing trees can be found HERE.
Other items such as outbuildings or sheds close to the fence can also sometimes be used by cats to escape. If your cat is able to access the roof of these types of structures, they should be considered as potential escape aids. With Freestanding Fence, we recommend that you adjust your fence line to be away from the structure, or that the fence runs around the structure so that it is outside of the cat-safe outdoor area.
If the structure is close to your existing fence, you may consider using Freestanding Fence to run around the structure, or jog your Existing Fence Conversion System around the roof of the shed.

More information about addressing obstacles in the yard can be found HERE.
After you’ve determined which fencing system(s) you need and how to address any potential obstacles, you can now measure the perimeter of the enclosure. There is no single correct way to take measurements, and your preferred method might vary depending on the equipment you have available. Generally speaking, the easiest way to take measurements is with a helper and a tape measure.
Tape measures come in a variety of lengths, but in order to collect the most accurate measurements, we recommend a long tape measure on a spool if you have one available to you. This tool allows you to measure a full side length at a time for most enclosures. But if you don’t have a long tape measure, you can still take measurements with a standard, compact measuring tape!
Before you get started, the following items will be helpful:
If you will be measuring for a Freestanding Fence enclosure, we recommend that you first walk and mark the perimeter before measuring. Mark each corner or turn with an object (such as a stick, rock, flag, spray paint, etc.). This will allow you to make any adjustments as needed before putting in the work of measuring! For long spans, you may place objects between corners to keep a line of sight down the proposed fence line. After the perimeter has been determined, start the measuring process.
For all fence types, start by drawing a rough sketch of the perimeter of the enclosure area and mark the locations of any gate locations. Next, pick a starting point (generally starting at a corner against a house or building tends to be easiest) and measure your perimeter one side at a time. If you have a long spool measuring tape, have one person hold the end of the tape at your starting point while the other person walks down the fence line to a gate or a corner. Make note of the length on your sketch.

When you come to a gate, measure the width of the gate and note it as well, then measure the next length of fence from the gate to a corner and note on your sketch. After you reach a corner and mark the necessary lengths, move the end of the measuring tape to the corner, and measure the next side length of the enclosure. Continue measuring and marking each measured length on your drawing until you’ve measured the entire perimeter. If your enclosure has a side that is made of a home or building, it is not typically necessary to measure the length of the home or building. But do be sure to measure lengths around any obstacles!
If you do not have a long spool measuring tape, you can use a standard, compact measuring tape. These tapes come in a variety of lengths (usually no greater than 50 feet), so there are a couple of ways that you can use one to measure your enclosure’s perimeter:
For example, you have a measuring tape that is 25 feet long. You start at the fence corner and are able to stretch the tape out fully 3 times down the span. Then, your final partial length measurement is 12 feet. In order to determine the total length you will multiply 25 feet by 3 (25 x 3 = 75) then add your partial measurement to get the total length of 87 feet for the span (75 + 12 = 87).
After each side length has been measured, you can add all of the lengths together to get your total fence length. If you will be combining systems, it is important to calculate those lengths separately and be sure to mark the different system locations on your drawing.
Finally, we recommend that you add 10% to your measurement(s) to account for any potential measuring errors and waste that may be cut away during installation. To calculate the length that includes an extra 10% use the following formula:

For example, you’ve measured your total fence length to be 133 feet:
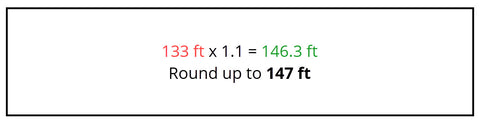
Now that you know the total length of fencing you have, you should be able to select the corresponding kit size that will work for securing your yard. In the example above of 147 feet, I would select the 150 ft kit. Kits are available in increments of 50 ft and will include the average number of spring-loaded arms needed for the kit length.
Some configurations may require more or fewer arms than those included in the kit, so we also recommend counting up the total number of arms that will be needed for your enclosure.
For the Existing Fence Conversion Systems, we recommend spacing spring-loaded arms between 8-10 feet apart. For most fence types, this will work out to be one arm on each of your fence posts because the majority of fences have posts spaced similarly.
For the Freestanding Fence System, you will install your fence posts with spring-loaded arms up to 14 feet apart. This is the maximum distance allowed between posts, and the distance used to calculate the total number of posts and spring-loaded arms that are included with the kits. You can certainly space posts closer together if it is necessary or preferred, but you may require additional posts and spring-loaded arms for this type of adjustment.
You can also use the drawing you created in step 2 to mark the locations where you will be placing spring-loaded arms. This can help give you an idea of how many arms will be placed on each side of the fence, and you can mark the locations of any obstacles or special situations as outlined below where you may need additional spring-loaded arms.
All of the Purrfect Fence Systems are designed to work in corners that are no less than 90 degrees. 90-degree corners are the most common and do not typically require any special hardware or components. In each 90-degree corner, you will need just one spring-loaded arm. It will be positioned at a 45-degree angle to split the corner into 2 equal halves.

For corners that are between 90 and 180 degrees, this rule will apply.
Corners that are greater than 180 degrees will require additional spring-loaded arms. These types of corners are called “outside corners” or “inverted corners.” If the angle is between 180 and 270 degrees, you will need 2 spring-loaded arms. The arms will be positioned in-line with the fence line to create a “+” or “X” shape.

If you have a corner that is greater than 270 degrees, we recommend adding a third arm.

These additional arms on outside or inverted corners will allow the Purrfect Fence to “wrap” around the corner without placing unnecessary tension on the arms so that they continue to function effectively in these areas.
For corners that are less than 90 degrees, you will need to remove them from the layout by cutting off the corner. This is done by installing a spring-loaded arm on the fence on either side of the corner - effectively creating two “new” corners. Then, extra mesh material can be worked back toward the existing fence corner creating a small mesh “roof” and sealing the corner.

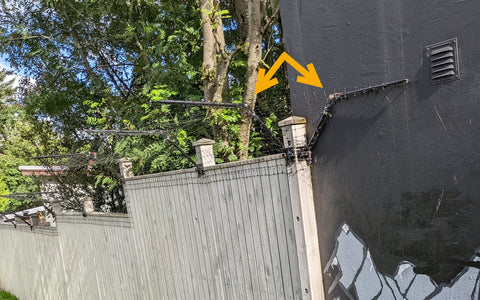
Many layouts will include at least one point where the Purrfect Fence runs up to and meets the wall of a home or other building. If the fence line is at least 22” back from a building corner, then just one spring-loaded arm is needed at the endpoint. The arm will run flush against the wall.

If the fence meets the building at a point where it is less than 22” from a corner, you may need additional spring-loaded arms to prevent lateral escapes. This will effectively “wrap” the arched Purrfect Fence top around the corner so that a cat cannot climb up and reach over the fence to climb out of the enclosure area.
Freestanding Fence gates are available as either Light-Duty or Heavy-Duty options. Light-Duty access gates are smaller and intended for occasional use. They are installed into the mesh fence material after the Freestanding Fence has been installed and do not require any additional spring-loaded arms. Heavy-Duty gates are larger and more rugged for regular use. These gates are built off of an existing fence post that already has a spring-loaded arm. The gate kit will include a second post for the opposite side of the gate, and a second spring-loaded arm is not necessary here. However, you can add one if you prefer to.
Gates within an existing fence can also be accommodated with the Conversion Systems. Exactly how a gate is outfitted will depend on the particular gate’s swing direction/configuration and location in the fence line. There are generally three primary ways to handle gates based on swing direction:
The gate swings inward.
For most inward swinging gates, you will need to install two spring-loaded arms side-by-side on the latch side of the gate. One arm will be on the latch post, while the other will be on the latch side of the gate door. When the gate swings open, the mesh material should bunch at the hinge side of the gate.
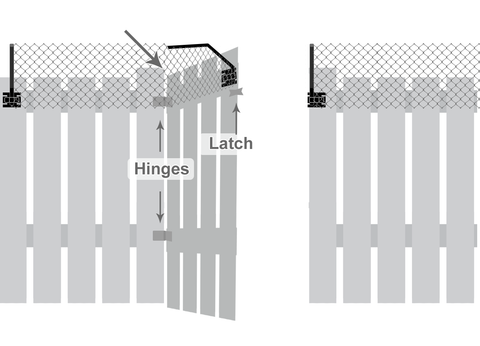
The gate swings outward.
For most outward swinging gates, you will need to install two sets of spring-loaded arms side-by-side on either side of the gate. One arm will be located on each post on both sides of the gate (one on the latch post and one on the hinge post). Then, the gate door itself will require an arm on each side of the gate door. When the gate swings open, the spring-loaded arm on the hinge side of the gate swings over the fence.

The gate has a header, or a header will be built.
This option is great for gates that are in more difficult locations where it can be challenging to install spring-loaded arms. A gate header is a structural addition that is built over the gate. Instead of securing the Purrfect Fence to the gate itself, it is run over top of the gate as if it was not there. Then, the gate can open freely underneath.
If you are combining multiple systems, you will only need one spring-loaded arm at the transition point. Exactly how you make the transition will depend on your particular fence, but you can view one example below.
![]()
After you have determined the total number of spring-loaded arms that you require, you can refer to the charts linked below to see if you need any additional arms above those included with the kit you’ve selected based on your fence’s total length.
Existing Fence Conversion System
Conversion System for Shorter Fences
Freestanding Fence System
Now that you have determined the total length of the perimeter of your enclosure and the total number of spring-loaded arms that it will require, you can start building your order. First, add the kit(s) that you need to your cart based on the total length of your fence. Next, if necessary, add any extra spring-loaded arms or other components that you require beyond those included with your selected kit. We offer additional spring-loaded arms in packs of two. Additional Freestanding Fence posts with spring-loaded arms are available in sets of 2, 3, or 4.
If you plan on purchasing a Freestanding Fence System, you can also add an access gate. As noted above, we have gates available in Light-Duty or Heavy-Duty versions:
Purrfect Fence systems were designed with the average “handy” homeowner in mind, so they do not typically require any specialty tools for installation. Basic tools are needed, but anyone familiar with DIY home projects would likely already have have these in their tool box. However, there are some tools that are available (and optional) that you might consider adding to your order.
Many of these tools are also pre-packaged into tool kits that offer additional savings!
And there you have it! After following these 4 steps, you should be able to determine exactly which Purrfect Fence system(s) you need to secure your yard, and which kit size is best suited for cat-proofing your yard! However, we understand that every yard is unique and each yard brings its own challenges to the table. If at any point you have a question about how to address a certain area, our team of experts is always happy to help!