


Most traditional fences were not laid out with cat containment in mind. There are many things that can make an existing fence challenging to make cat-proof. The best advice we can give our customers of the Existing Fence Conversion System is to plan out how to apply our system to your fence prior to beginning the installation. In reviewing the instructions and this planning guide does not answer any specific questions, please contact us and include whatever diagrams or photos we will need to help you.
This article is addressing general scenarios common to many fence types. We attempt to address some of the more common issues below. But, cat proofing an existing fence is dynamic and very much an art more than a science. If you encounter issues not covered in the instructions or below you are welcome to contact us so we can assist you.
Fence Ends At the Corner of a House or Building
The single most common mistake we see here at Purrfect Fence is a poor beginning/ending of the system at a building. This can take many forms but the biggest offender happens when the existing fence line runs into the back corner of the house parallel to the back of the house.
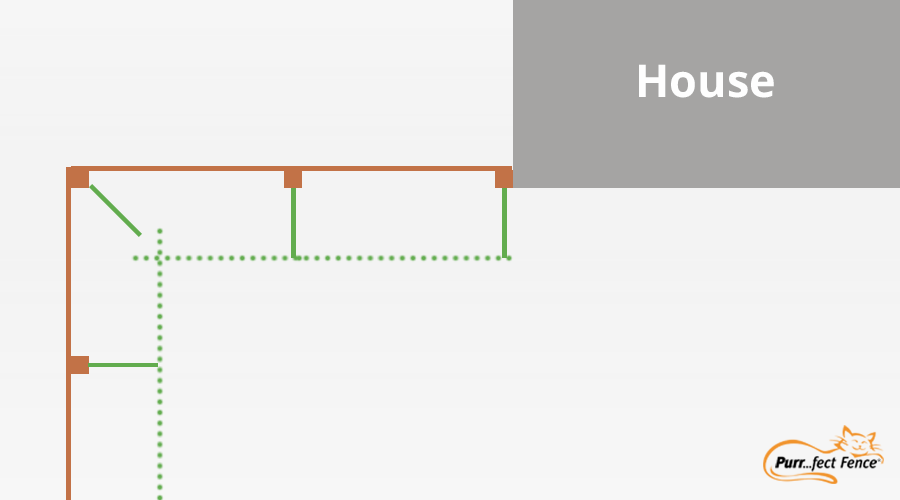
The mistake made is that only one arm is mounted to the post against the back corner of the house. This makes it so the end of the fence is just at an arm that is not against anything. The cat could climb the post and just go around the arm.

If your fence end like this against the corner of a building, you need an extra arm to finish the fence.
Fence Ends Just Barely Offset to the Corner of a Building or HouseA variation on the first scenario is when the fence comes into the side of a building but not far enough towards the front side of the house to allow the majority of the arm to finish against the side of the house. If that distance is a few inches to about a foot, you would need to add an arm mounting bracket and arm to the side of the house:

If the distance is 22”+ you may want to just have the arm against the side of the house and the tip of the arm sticking past the back corner just a bit and observe your cat(s) to see if any attempts at escape happen at that endpoint.
The very tricky scenario is if that distance is 12” to about 21”., Here is one way to handle that situation:

This method uses (3) arms in one mounting bracket secured to the back of the house at the corner.
Existing Fence Changes Height or Steps Down
Another recurring customer mistake is what to do about a fence that changes height.
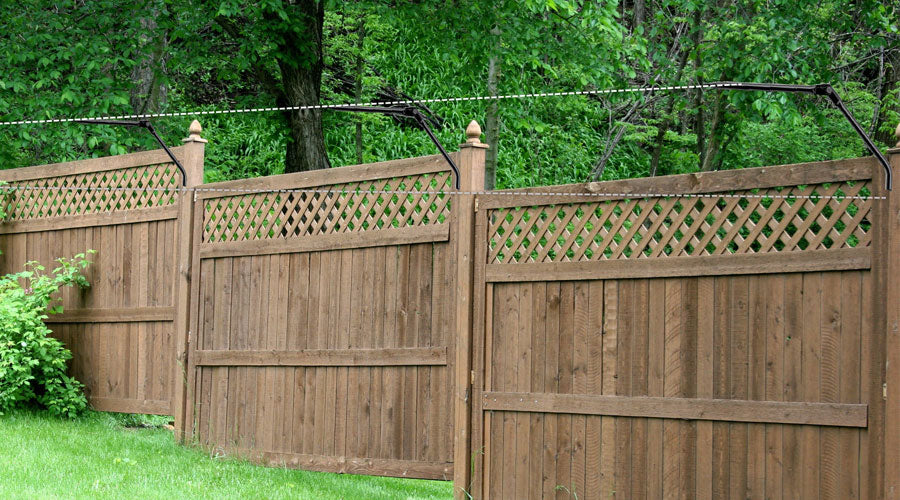
It is not necessary to position the arms to imitate the “steps”. This would require two arms and mounting brackets on each post and the end result would make a pretty big weak point at every post. The way to handle a stepped fence is to set the arms at a constant slope:

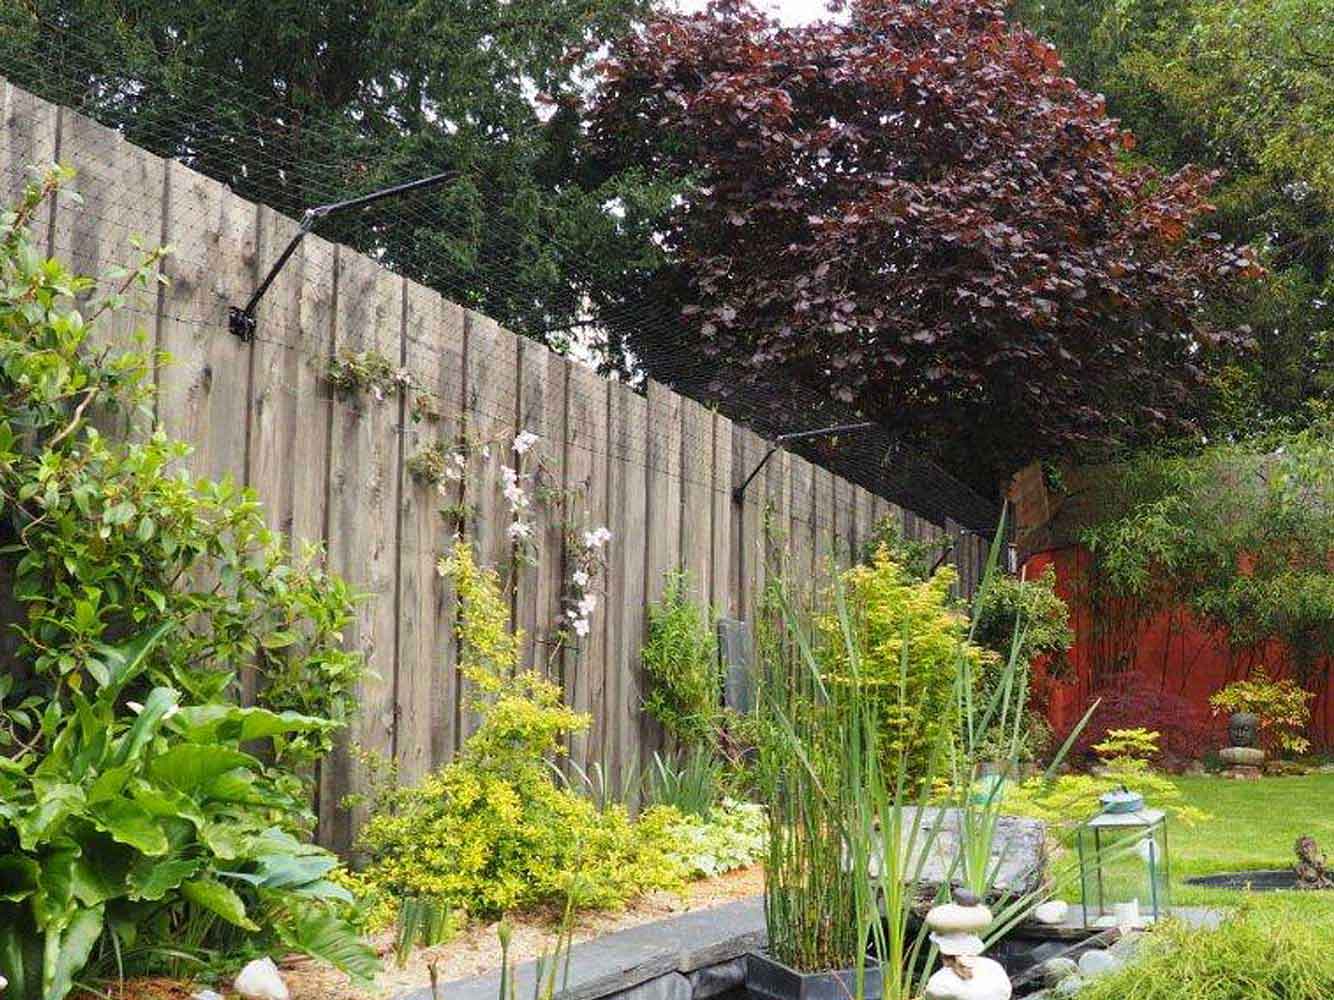
Trees and/or Shrubs Near the Fence Line
Things growing near the fence can block installation of the arms and fence, interfere with the function of the system and/or allow a cat to get on top of the system by climbing. Sometimes a tree/shrub problem can be solved with a bit of trimming. Sometimes things can be added to the tree to keep a cat from being able to climb it. Sometimes a choice needs to be made between cutting down that tree or shrub or running Free-Standing fence in front of it excluding the offending plant.
The mistake made here is not thinking that a tree or shrub is going to cause a problem so our system gets run right past it like it is not even there. An even bigger mistake is thinking that “the cat is not going to climb/ go through this" and so the section is left open altogether.
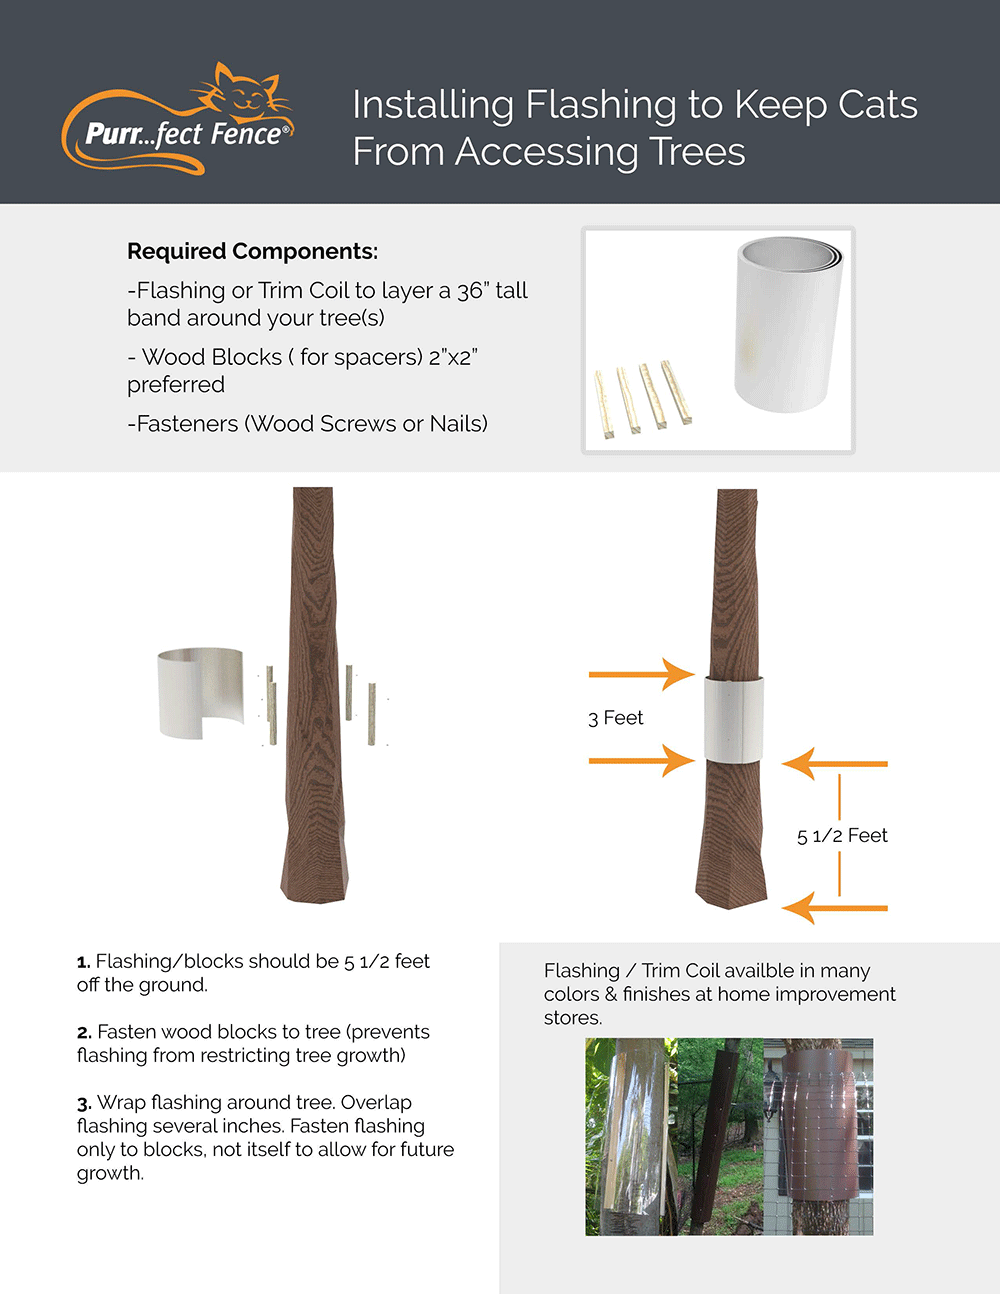
Trees near the fence with no low branches near the fence can often be handled be securing something hard and smooth to the tree that the cat cannot dig their claws into such as our proven DIY solution for cat proofing trees.
For a large tree against the fence, arms directly on the tree can be the best answer:
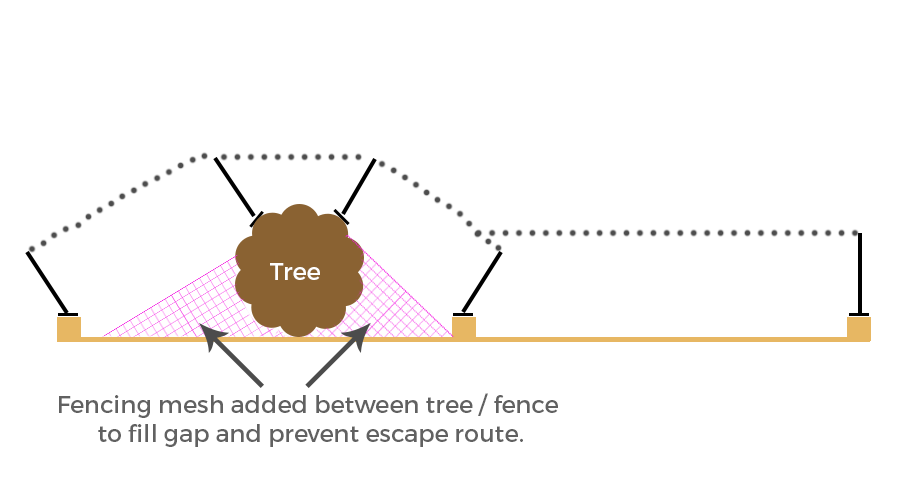
For trees that are within a few feet of the fence line, it can often be best to outfit them with a "baffle."
Trees with low branches or tall shrubs can take a different solution. A very common type of planting is tall evergreens like arborvitaes right against a fence. Your choice for this scenario is either cut the trees down or to about 3ft high or “box them out” by running our Free-Standing system in front of them:

Here is a situation where tall evergreens are growing against a fence into a corner of wood fence. One way to handle it would be to “box out” the evergreens with Free-Standing fence. A gate would be needed to access the area:

Another way to secure the section with evergreens would be to more closely follow the fence line like:

Although you could put the Free-Standing fenced right against the evergreens and skip the gate, you would leave no room for maintenance and the trees would likely grow into the fence. The problem with this is that these types of trees typically have flexible trunks and strong winds and snow loads could then damage the fence with the movement of the trees.
Take the evergreens and replace them with vines on the fence or some other growth. This is still handled in a similar manner. Cats will climb what you think they will not climb if they want to get out and you cut off every other way with our system. Even if the vines or whatever the growth is “impenetrable/unclimbable” (and it isn’t) there is no good way to end our fence and then restart it against plants making those the weak points.
How to make the mesh fencing material look aesthetically pleasing
The key to hanging the fence from the arms so the finished fence looks as good as possible is primarily the positioning of the arms. This is especially true on relatively flat/level areas. Set the first and last arm mounting bracket in a straight line of fence on level ground (so end to corner/corner to corner section). Use a string pulled tight from the first mounting bracket to the last mounting bracket to determine exactly where on the post to mount the other mounting brackets.

Try to mount the arms so they are all at the same height in the arm mounting rings on the plates. Check your work by looking down the line of installed arms and seeing if any are higher or lower. If so, adjust those arms and recheck.
After that is done for the entire fence, begin the installation of the poly fence as prescribed in the instructions. If there are any sags, they can be adjusted out but only after all the poly fence is installed.
Removing Sagging or Tweaks in Mesh Fencing Material
The fence behaves like a sheet and has very little stretch. For this reason, trying to “pull out” sags between arms does not work out well. The way to minimize/eliminate sagging between arms is to make long narrow triangle-shaped folds in the fence similar to pleats and darts in fabric. This is done by securing 1 or more squares of fence together with zip ties or hog rings. This is done in line top-to-bottom or bottom-to-top. This is also done at arms to minimize the visual impact. If the sagging is more towards the tip of the arm, then the folding will be greater at the tip and will decrease as you work your way towards the bottom of the arm. An example would be three squares of fence cinched together at the top edge and then two squares closer to the spring joint, then one square after the spring joint and then none were the arm meets the mounting bracket. You will need to secure in-between the noted cinches every other square as you work your way down.
If the sag in the fence is greatest on the lower part of the arm, the cinching will start at the bottom edge of the fence and work its way up.


